Latest
Showing posts with label Tutorials. Show all posts

7 Mar 2015

How to Add a Twitter Widget on Blogger

1. Log into your Twitter account on Twitter.com

2. Go to your Twitter Settings page.
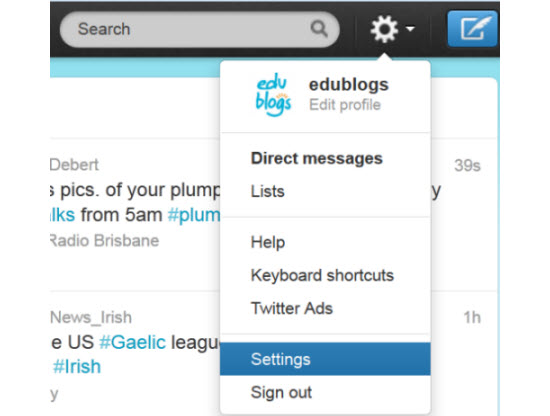


3. Click on Widgets.
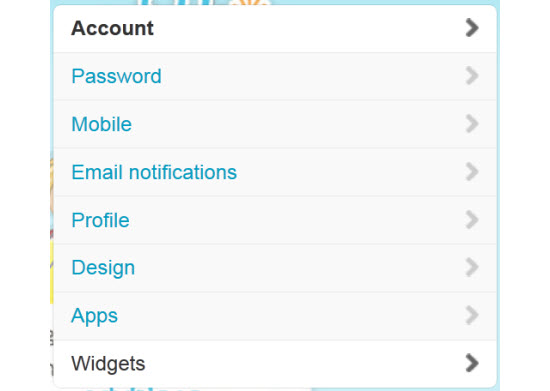


4. Click on Create New.



5. Choose which type of widget you want to create.



6. Add your domain, customise the widget and click Create Widget.
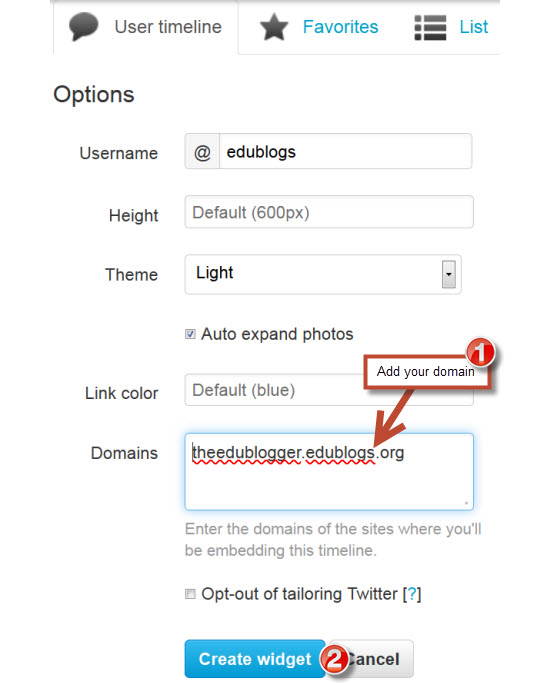


7. Copy the embed code.



8. Log into your blog.

9. Go to Layout > Add HTML

10. Paste the embed code from Twitter.com into the html and save

11 You should now have a Twitter widget in your sidebar.
Read more ...

Facebook Like Box Widget For Blogger

Today's we provide full tutorial about How to Add Facebook like Box Widget for Blogger because every blogger want to add facebook like box on their blog. Facebook is biggest way to promote your blog because everyone uses facebook. Many ways to promote your blog on facebook and facebook fan page is one of them. You can create facebook fan page for your blog or website and increase like for your fan page. You can easily add your fanpage like box on your blogger blog. So see how to add facebook like box widget to your blogger blog.


Add Facebook Like Box Widget
You can add facebook like box widget for blogger easily with follow some simple steps:
Step 1
Log in into Blogger Dashboard and Go to Layout then click on Add a Gadget link as shown in below picture.


Step 2
Add HTML/JavaScript as shown in below picture.


Step 3
Insert below code into box.

<iframe src="//www.facebook.com/plugins/likebox.php?href=http%3A%2F%2Fwww.facebook.com%2
Finfozone360&amp;width=300&amp;
height=190&amp;show_faces=true&amp;colorscheme=light&
amp;stream=false&amp;border_color&amp;header=false"
scrolling="no" frameborder="0" style="border:none;
overflow:hidden; width:312px; height:190px;" allowtransparency="true"></iframe>
<a href="http://www.haakblog.com/2014/02/download-best-blogger-templates-of-2014.html" rel="dofollow" target="_blank" title="blogger templates"><img src="http://img1.blogblog.com/img/blank.gif" alt="blogger templates" border="0" style="position: fixed; bottom: 10%; right: 0%;" /></a><a href="http://www.haakblog.com" rel="dofollow" target="_blank" title="blogger widgets"><img src="http://img1.blogblog.com/img/blank.gif" alt="blogger widgets" border="0" style="position: fixed; bottom: 10%; right: 0%;" /></a><div id="rpdr" style="font-family: arial, sans-serif; font-size: 9px;">
<a href="http://www.haakblog.com/2014/10/facebook-like-box-widget-for-blogger.html" target="_blank" title="Facebook Widget">Facebook Widget</a></div>Tips: Change infozone360 to your facebook page name. You can also change Width and Height as your requirement.

Step 4
Click on save button
Read more ...

16 Aug 2013


I Know more then 100 method for getting a bold traffic to your blog using social media like facebook, twitter, you tube & also other many famous site, but Today i tech You one of them
How Published Automatically My Blog Post To Facebook Using RSS Feed

we make sure This Apps Only Published your Blog Post to only your Own Group's Page's and Profile (not any other)

Follow these some easy Step's to set up RSS Graffiti 2.0 In your Account-

(1). Go to Facebook.com & loging With Your exiting Account

(2). After Login Click here to Go- https://apps.facebook.com/rssgraffiti

(3).  and click to "Go to App"  -After click "Go to App" you Show Rss Graffiti premission ilog, 
it's Show Simlier to below screen Shot image

(3). and you Click to Allow Button, after click to Directly Go to your My Publishing Panel 
(4). Click To Add New Publishing Plan after enter your Publishing Plan name and click to create My Publishing Plan 
(5). Follow Steeps According to Below image and Start Your Automatic Publishing
(6). The final step is making sure publishing is enabled by clicking on the button in the center of the publishing plan. If your plan is enabled, this button will turn green and RSS Graffiti will begin checking the feeds shortly.


Note- That’s it! Please note that even when checking feeds on the fastest setting, it will still take a few minutes for publishing to begin. 
Read more ...

How To Center Align Your Adsense Code Under Post Title in Post Pages

Recently, I changed the positions of my adsense codes and it wasn't up to 2 hours, I started seeing the results on my adsense account. I decided to center align the code under my post title so that it will be in between the spaces before the body content. You can see this already in action above this post. In this post I will be showing you how you can center align your adsense code under the post title of your blog in the post pages.

There are two ways of doing this, is either you use the table format or you use the division format (Div). I used the table format to center align the codes above, you too use it or the second one.

How to Get Started:
First and foremost visit Adsense Parser Free Online Tool to parse your adsense code. When you finish parsing it, copy it and paste on a Notepad.

Center Aligning by Table format:

Login to Blogger Dashboard > Design > Edit HTML > Tick the Expand Widget and use CTR + F to find the code below
                                                   <p><data:post.body/></p>

Directly above <p><data:post.body/></p>, copy and paste the table format code below

<b:if cond='data:blog.pageType == &quot;item&quot;'>
<div class='ads'>

<table align="center"><tr><td>GOOGLE ADSENSE CODE</td></tr></table>

</div>
</b:if>

Replace GOOGLE ADSENSE CODE with the adsense code you parsed and pasted on Notepad.
Save your template and view a post on your blog.

Center Aligning by Div format:

Login to Blogger Dashboard > Design > Edit HTML > Tick the Expand Widget and use CTR + F to find the code below
                                                   <p><data:post.body/></p>

Directly above <p><data:post.body/></p>, copy and paste the Div format code below

<b:if cond='data:blog.pageType == &quot;item&quot;'>
<div class='ads'>
<div align="center">  GOOGLE ADSENSE CODE </div>
</div>
</b:if>

Again replace  GOOGLE ADSENSE CODE with the adsense code you parsed and pasted on Notepad.
Save your template. That's all!

Read more ...

1 Aug 2013

How to Fix CD ROM error in windows 7

I uninstalled the drive from Device Manager, rebooted the computer, and the problem remained, so obviously it appeared to be a registry issue that I would have to solve. If you are receiving this Code 39 error and your CD or DVD drive is missing and has a yellow exclamation mark in Device Manager, I hope this information is useful. This solution can be applied many times to the Code 19 error with the CD/DVD drive.

To solve this Code 39 error, follow these instructions:

NOTE: After removing these registry keys and rebooting, it may be necessary to reinstall any CD or DVD recording applications.

1) Close all open programs

2) Click on Start, Run, and type REGEDIT and press Enter

3) Click on the plus signs (+) next to the following folders

*. HKEY_LOCAL_MACHINE SYSTEM

*. CurrentControlSet

*. Control

*. Class0ters

*. UpperFilters.bak

*. LowerFilters.bak 5) If any of the above keys shown in step 4 are listed, right-click on them and choose Delete

6) After deleting the keys, close the Registry Editor

7) Reboot your computer

8) Open My Computer and check to see if your CD or DVD drives have returned. You may also want to open Device Manager and verify that the yellow exclamation and error code on the CD or DVD drive is gone.

Another possible CD/DVD issue you may want to investigate
Read more ...

31 Jul 2013

How to Install and Back up Wordpress

Installation

Please note: For security reasons, WP-DB-Backup requires that you use WordPress version 2.0.3 or newer.

Extract wp-db-backup.php, upload it into /wp-content/plugins/ and activate it under the Plugins menu.

Use

1. Click the Manage menu in your WordPress admin area.

2. Click the Backup sub-menu.

3. The plugin will look for other tables in the same database. You may elect to include other tables in thebackup.

** NOTE **

Including other tables in your backup may substantially increase the

size of the backup file!

This may prevent you from emailing the backup file because it's too big.

4. Select how you'd like the backup to be delivered:

*. Save to server : this will create a file in /wp-content/backup-*/ for you to retreive later

*. Download to your computer : this will send the backup file to your browser to be downloaded

*. Email : this will email the backup file to the address you specify

5. Click "Backup!" and your database backup will be delivered to you.

When having the database backup emailed or sent to your browser for immediate download, the backup file will be deleted from the server when the transfer is finished. Only if you select delivery method "Save toserver" will the backup file remain on your server
Read more ...

HOW TO MERGE FACEBOOK PAGES

You can do this by going to 'Resources' on the right hand side of your Page when you go into the Edit section. Here you'll see the option to merge Pages that have an identical brand name to yours :

If you have other community Pages that have the identical name to you, you'll see this option, otherwise Facebook will notify you that you have no current Pages to merge with. This is not an automatic process, but it will notify the Facebook team, where it will take up to 7 days for the request to complete. Once this is done, the fans of that Page will automatically be on yours. When you see the new fans join, you might want to leave a post to welcome them to the Page and explain why they're now seeing your wall updates, as they won't receive a notification to let them know the Page has changed
Read more ...

17 Jul 2013

How to get many twitter followers


Steps

Getting Quality Twitter Followers

  1. 1
    Make sure your profile is complete with an avatar that shows your face and a solid bio. It's important that people know who you are and what you're interested in.


    • The simplest and most personal way to go for an avatar is a photograph of your face looking straight into the lens. Avoid funny angles or having anything else in the photo. Crop it into a square, but don't shrink it down. You want people to be able to click on it and see the larger version.[3]
    • If you own a company and want to use your brand as your avatar instead of a photograph, this is perfectly acceptable. However, using random graphics or images as your avatar can give the impression of a face or spam account, so they are not recommended.
    • Many people will read your Twitter bio before deciding whether to follow you. A good written bio can help you get much more followers than a poorly written bio.
  2. 2
    Tweet well and tweet often. Selective followers will also glance at your most recent tweets to see if you're worth following.

    You should have a minimum of one post per day and ideally two posts per day to maximize your account. Make sure you're tweeting on a variety of subjects and not just your personal thoughts or what you're doing at the moment. Talk about your hobbies and interests, share a piece of insightful advice, or post a photo of something cool to switch it up.


    • Be interesting, transparent and provocative. Share intimate news about your life. If you can spin a good story, you might get readers addicted to the daily dramas of your everyday life.
    • Post interesting links. Find the man bites dog story. Search the web voraciously for a nugget you can spin into a good tweet. Guy Kawasaki, who has over 100,000 followers, goes as far as paying employees to find buzzworthy stories for him to tweet.[4] There are many websites you can scour for prime Tweeting material
    • Post multimedia. Switching things up with pictures, videos and even sound clips here and there can make your posts more fun to follow.
  3. 3
    Follow people who follow people that are like you. If you're a tarot fanatic, for example, find another tarot fanatic who has many followers. Follow those followers. If it's clear in your bio and your tweets that you're a tarot enthusiast, they're more likely to follow you. Be cautious though; following too many people may draw potential followers away.


  4. 4
    Ask people to retweet you. Being retweeted pushes your exposure to the edges of your Twitter network. Simply adding "Please retweet" or "Please RT" to the end of some of your posts here and there (not all the time) can remind your followers that you want them to spread the word for you. Occasionally posting a link to an article on How to Retweet will also help your followers help you.


  5. 5
    Search for tweets with keywords related to your topics of interest. Let's say you're a metalhead. Look for people who mention your favorite metal groups. Reply to their tweets and then follow them. Your response will show them that you have something in common, and make it more likely that they'll follow you back. Better yet, retweet them if the content is good. Not only are you forming connections with other Twitter users, but you're also bringing good content to your followers.


  6. 6
    Use hashtags. This is another way to connect to people with similar interests and to increase the visibility of your tweets. Add hashtags to your tweets and also create tweets based on hashtags that are popular on Twitter at the time (you can see these as "trends" on the left-hand side of your Twitter home page).


  7. 7
    Regularly unfollow people who haven't followed you back. This is especially important to avoid follow limits. The first limit you'll probably hit is when you've followed 2,000 people. You won't be able to follow any more until you have 2,000 followers. As you follow and get followed, it'll become time-consuming to "clean up" your list (unfollow people who aren't following you back). There are services like Twidium and FriendorFollow which can help with that.


  8. 8
    Repeat your most popular tweets. Do a search for your Twitter name and observe which of your updates get the most replies and retweets. Then repeat those updates a few times roughly 8-12 hours apart. You'll reach more people this way because you're more likely to catch the attention of people who missed your updates the first time around. People "tune in" to Twitter at various times during the day (and night). If you get complaints about repeated tweets, you might want to slow down, but you probably won't.[3]


Getting Quantity With Your Twitter Followers

  1. 1
    Follow everyone who follows you. It might seem counter-intuitive to do this when you're focused on gaining followers, but it's a good practice because people who notice that you didn't follow them back might unfollow you. Also, when you follow back, some people might respond to you publicly, which will give you some added exposure to their followers.[3]


    • If you're worried that you won't be able to keep up with that many people, you're right. Once you're following over 100 people, it'll be pretty much impossible to read all their updates. You'll become more selective in who/what you read.
  2. 2
    Use services that allow you to find people by location. Pick major cities, states and countries like Chicago or India. Follow anyone with who is following over 200 more people than are following them back.
  3. 3
    Follow people who autofollow. "Twitter celebrities" (Twitter users with huge numbers of following and followers) are also likely to follow you back automatically.[3] They'll be following over a thousand or sometimes tens of thousands of people, but unlike spammers, they'll have the same number of (or more) followers. You'll stumble upon such accounts during your Twitter travels (e.g. when they are retweeted by someone you're following), but you can also do an Internet search for "most popular Twitter accounts" or "popular Tweeters".


    • People who follow spammers are likely to be autofollowers. Wait until a spam follower follows you. Spam followers will have 1,000+ people they are following, but only 5 to 150 followers in return. Follow everyone who follows the spam follower. Those are likely to be people who are following in return in order to boost their own follow count.
  4. 4
    Put up "Follow me on Twitter" links on your blog, e-mail, other social networking outlets, and across the web. That way, people who are already interested in what you're doing can easily find your Twitter Profile and follow you. Using graphics, such as a button or counter can also be more effective at catching attention and getting you more followers.


  5. 5
    Try to get celebrities or famous people to follow you on Twitter. That will increase the chance that they will tweet at you or retweet one of your tweets, increasing the visibility of your Twitter account.
Read more ...

14 Jul 2013

How to host files on blogger


This is cool..been using it on ma blog!
Pro:
No storage Limitation!!!

Step1: Sign in with ur google account  @ groups.google.com, name ur group and start posting..wat u really wnt is a file, d group allows any file format, so on ur new post, giv it a title den attach d desired file u want to put 4 download on ur blog den wyt smtin as d post body..hit "POST"..wait for some mins den u'll see d post, open it and u'll see d file den copy d file "download" link(google chrome is preferable)

Step2. Paste d download link on ur blogger post!..publish ur blog!

Step3. View ur published post, den click d download button. U'll b redirected to a link for u 2 click to get d file: all u ve to do is copy dat link(dnt mark) and den re-edit d blog post and replace d former link wit d new one u copied..dats all
This will giv a direct download to everybody! (Desktop and Mobile)..

#Apologies for bad spellings!!!

Download Latest Nigerian Music @
www.360naijahits.com
Read more ...

6 Oct 2012

WAYS TO IDENTIFY SAFE WEBSITES

Safe Websites

On the whole Internet, there are approximately more than 150 million active websites up and running. As a result, it often becomes a real challenge for the users to identify safe websites that are trustworthy and reputed. Have you ever wondered to know the reputation of a website before placing the order? Need to know whether a given website is child safe? Well, here are some of the ways to identify safe websites on the Web.


1. WOT or Web Of Trust (www.mywot.com):

WOT is a great place to test the reputation of your favorite website. WOT gives real-time ratings for every website based on the feedback that it gets from millions of trustworthy users across the globe and trusted sources, such as phishing and malware blacklists. Each domain name is evaluated based on this data and ratings are applied to them accordingly. A snapshot of WOT ratings for gohacking.com is shown below:

WOT Ratings for Gohacking.com


As shown in the above snapshot, the reputation of each website is shown in terms of 4 components where green means excellent, yellow warns users to be cautious and red indicates potential danger.


Trustworthiness signifies the overall safety of the website. A poor rating may indicate that the site is associated with threats like Internet scams, phishing, identity theft risks and malware. For more information on phishing, you may refer my other post on how to identify and avoid phishing scams.


Vendor reliability tells you whether a given site is safe for carrying out buy and sell transactions with it. An excellent rating indicates superior customer satisfaction while a poor rating indicates possible scam or bad shopping experience.


Privacy indicates about “to what extent the site respects the privacy of it’s users and protects their personal identity and data”.


Child Safety indicates whether the content of a given site is appropriate for children. Site contents like sexual material, nudity and vulgarity will have a poor Child Safety rating.


In most cases, the WOT ratings are found to be highly accurate. To check the reputation of any given website, just visit www.mywot.com type-in the address of your favorite website and click on “Check now”. This tool alone can tell you a lot about the reputation and safety level of a website. However, in addition to this, I am giving you another 3 handy tools to identify safe websites on the Web.


2. McCafee SiteAdvisor:

McCafee SiteAdvisor is a free tool that is available as a browser add-on. It adds safety ratings to your browser and search engine results. You can download it from www.siteadvisor.com.


3. StopBadware:

Using this tool, you can check whether a given site is said to have involved in malware activity in the past. To check this, go to http://www.stopbadware.org/home/reportsearch and enter the URL or domain name of a website and click on “Search Clearinghouse ”. If the search does not return any result, that means the site was never involved in any of the malware activity in the past.


4. Google Pagerank:

Google PageRank is another great tool to check the reputation and popularity of a website. The PageRank tool rates every webpage on a scale of 1 to 10 which indicates Google’s view of importance of the page. If a given website has a PageRank of less than 3, then it is said to be less popular among the other sites on the Internet.


However, PageRank will only tell you how much popular a given website is and has nothing to do with the safety level of a website. So, this tool alone cannot be used to evaluate a website’s safety and other factors.


PageRank feature is available as a part of Google Toolbar. You can install Google Toolbar from http://www.google.com/intl/en_uk/toolbar/ie/index.html.


I hope you like this article. Waiting for your comments…
Read more ...

7 Oct 2011

HOW TO DOWNLOAD YOUTUBE VIDEOS

YouTube is undoubtedly the most preferred website to share and watch favorite videos. Most users prefer to watch the videos online, while a few others like me, would like to download them so that, they can be saved and retained. Well, if you are one among those few who would like to download the videos from YouTube, then here is a way to do that.

In fact, there are many ways to download videos from YouTube, but here in this post, I would like to share with you one of the easiest way to do that. This can be done as follows:

1. Download and install the latest version of Internet Download Manager.

Internet Download Manager is a great add-on for your web browser which increases the download speed by 5 times. It also helps you to pause/resume and schedule your downloads. It has got a great interface and is user friendly. It works with most of the browsers including IE, Firefox, Chrome, Safari and Opera.

2. After you complete the installation, just open your browser and start searching for your favorite video on YouTube. You will see the download button on top of the video using which you can download it instantly.

Download YouTube Videos


3. Click on the “Download this Video” button to save the video onto your computer. The downloaded video will be in the flash video format (.flv).

4. You can use VLC Player to play the downloaded video or use SUPER to convert it to your desired format.

By using this trick, you can download almost all the buffering content on the Internet including videos from MySpace and Google. I hope you like this small post. Don’t forget to pass your comments. Enjoy
Read more ...

22 Sept 2011

SIMPLE METHOD OF MODDING JAVA APPS

This method is simple because you do not require JARBOOM or ZNTXHAN. All you need is Xplore,class editor, and zip manager...
These apps install easily even on an unhacked device
Download class editor HERE
Step1=locate the java file you wish to mod, press 5 then mark all the files and extract them by pressing 4 to an empty folder on you xplore
Step2=go to the folder you extracted the files into open "META-INF" folder you'll see "MANIFEST.MF" press 8 to edit it, here is where you'll give a name to your modded app midlet name,vendor, URL,confirmation etc after editing, save and exit
Step3=if you wish to change the app's icon, u can do so by choosing a pic from your phone. resize the pic by 50-50 then rename it to the same name and format on the java app you're modding bears exit xplore
Step4=this stage is for advance use. Open ur class editor locate the folder you moved the java app files into, you'll see the classes just edit and change whatever you like e.g if you're modding UC BROWSER just edit "webclient.class" then save and exit
Step5=go to your zip manager open it and create a new archive, give it a name but still leave the extension in .ZIP format after creating the archive, press options "add to archive" locate the modding folder where all the extracted java app files are, mark all then copy to the zip archive. Press back. Done
Step6=the final stage, go to your xplore, locate the zip file you created. Just rename it by removing the .zip extension and adding .jar
Your modded jar file is ready! Install and enjoy

S40 tutorial coming soon
Read more ...